Category Archives: DXpeditions

The VP2MUW DXpedition – Montserrat 2018

I’ve spent the last week with Rob M0VFC and Dan M0WUT on a DXpedition to Montserrat as VP2MUW. This post is part-diary, part-informative for anyone who wishes to follow in our footsteps.
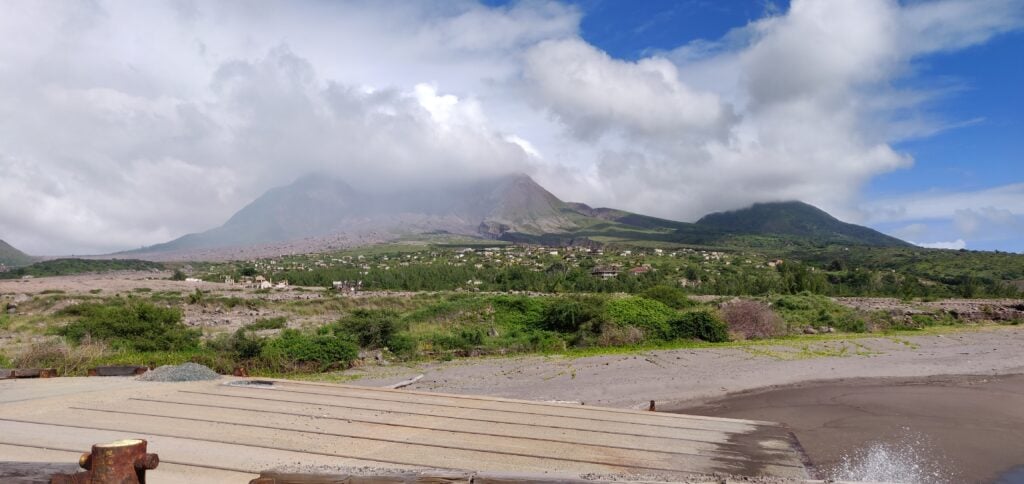
Plymouth, Montserrat

Travelling to Montserrat

Montserrat’s main airport was destroyed by the volcano eruptions in 1997 and 2010. Today, there is just a small airstrip on the island, but it can only support small planes, so luggage allowances are limited. Instead, we flew to the neighbouring island of Antigua, took a taxi across the island, and then onto the Jaden Sun ferry (actually a catamaran) from Antigua to Montserrat. This allowed us to take all our equipment without any hassle.

Our British Airways flight from Gatwick arrived at about 3pm. It then took about 30 minutes to get through Antiguan immigration and customs before we could get into the taxi. The airport has a very efficient taxi rank, which includes giving a guaranteed price for the taxi. For the three of us with our luggage, it cost US$14 for the 25 minute journey across the island to St John’s harbour. (Note that in both Antigua and Montserrat, prices may be quoted in either East Caribbean Dollars (XCD) or US Dollars (USD). Both currencies are widely accepted, however things tend to be more expensive in USD.)

The ferry port was a fairly disorganised place. There are two separate booths, one to collect the ferry ticket and register for the crossing, and the other to go through emigration formalities. There is also a further customs booth for paying Antiguan departure tax if you are eligible to pay it (see below). You have to check in 90 minutes before the sailing but, even having done all these bits of paperwork nice and early, we still had to wait as disembarking passengers coming from Montserrat had to go through similar formalities before we were allowed to board… and Customs hadn’t turned up to process them!

The ferry crossing takes about 1.5 hours and we arrived in Montserrat at 9:30pm – half an hour late because of the Customs delay in Antigua and it then took another 30 minutes or so for us to clear immigration into Montserrat. Luckily, David from Gingerbread Hill was there to pick us up and was prepared for the wait.

A quick word about how immigration and departure tax works: in Antigua, we indicated on our landing cards that we were in transit, and we got special visas accordingly, marked MNI on the way out and LGW on the way back (airport codes for Montserrat and Gatwick respectively).  You are exempt from Antiguan departure tax if you have been in Antigua for less than 24 hours and so having these special visas saved us that cost. On the return journey we did need to show our BA boarding passes in order to get the LGW visa (we had already checked in for the flight online); on the outbound journey I had printouts of the ferry reservation available but these weren’t required.

The return journey was the same but in reverse, although timings were slightly more critical. We took the risk of getting the evening ferry from Montserrat at 5pm, arriving into Antigua at 6:30pm. This didn’t leave a huge amount of time for clearing customs and making it across the island in time to check in for our flight at 7:50pm. (Especially as Friday evening is the time that Antiguans like to go en masse to the KFC drive-through, I kid you not! This led to an extra traffic jam around the restaurant, adding about 5 minutes to the taxi journey.) It all worked out fine, however, and we were glad to take the risk as the alternative would have been to get the 6am ferry and wait around in Antigua with our luggage all day. Incidentally, departure tax is also payable when leaving Montserrat. This was EC$45 each plus a EC$10 security charge. The only thing to note is that the PeliCases containing the two amplifiers were sent to outsize baggage at Antigua airport where they were manually checked thoroughly, and we did need to show our radio licences.

We flew in British Airways ‘World Traveller Plus’ (their marketing name for Premium Economy). While not the most economical use of the Avios points (the International Airlines Group marketing name for air miles) we were burning, it gave extra baggage allowance, and the extra comfort and legroom were particularly welcome on the overnight flight back to the UK.
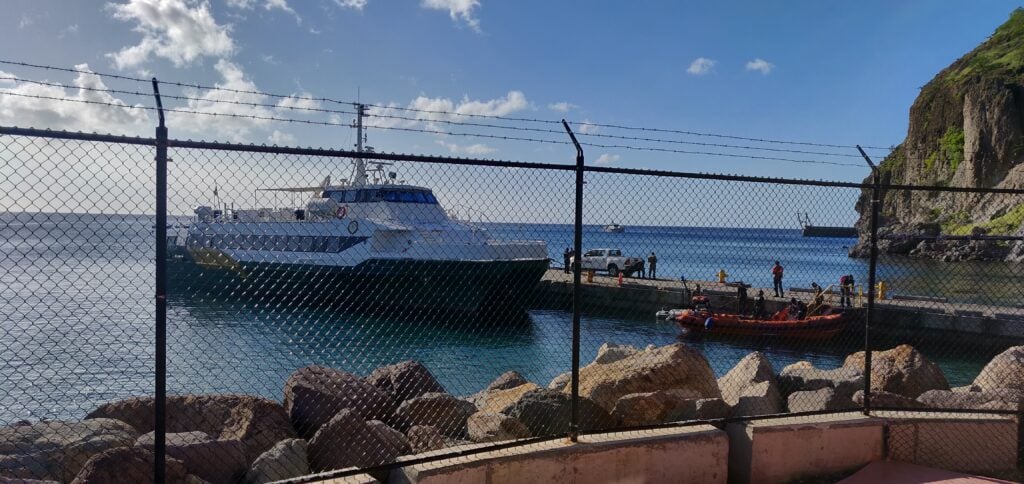
Catamaran
Jaden Sun

Radio from Gingerbread Hill

We stayed at Gingerbread Hill, well known among radio amateurs for the fact that the villas contain a ham station, tribander yagi and mast. It also has a fantastic sea-path take-off to the US and a reasonable take-off to Europe. We rented both the Heavenly Suite and Two Bedroom Villa (the suite being the upper floor of the same building as the villa). Both the suite and villa have double bedrooms, and the villa also has a room with two single beds. Amateurs take the Heavenly Suite as that provides roof access to the mast, but it’s strongly recommended you also book the villa – as we did – to prevent disruption to any non-ham guests in the same building.

From the equipment at Gingerbread Hill, we used the tribander and mast, some coax, 80m and 40m dipoles, and the rotator. Everything else we brought ourselves, including 3xK3s, KPA500, Juma amp, CW keys, power supplies and other wire antennas. Massive thanks, of course, to K2DG who keeps his equipment at Gingerbread Hill and makes it available to other visitors. There’s some slightly outdated information on his website, but I’d recommend anyone else emails him directly before travelling to get the latest information about the condition of the gear.

On the topic of power supplies, Montserrat uses two electrical standards and Gingerbread Hill is no exception. There are both 110V American style plug sockets, and 240V (we measured 238V) British three-pin sockets. This obviously makes using amps easier than in most other parts of North America. On the other hand, Montserrat does suffer from regular powercuts, as the entire island is apparently serviced by just one 1.5MW diesel turbine, although some experimentation with geothermal energy in association with an Icelandic company is also in progress. We had three or four powercuts over a couple of days, each lasting around 30-90 minutes. We did have a 5000mAh LiPo battery with us, so we could continue making some contacts on one station during one such event. By the way, a very modest extra charge for electricity is added to the Gingerbread Hill bill for ham operations. We were charged EC$27 per day.

Licences need to be applied for, ideally about 3 months in advance of the trip. The instructions and application form are on the MCIA website. The MCIA office is very close to Gingerbread Hill and Clover (David’s wife) kindly offered to collect the licences for us and to add the licence fee to the credit card she was already holding for the room booking, making the licensing process very easy.

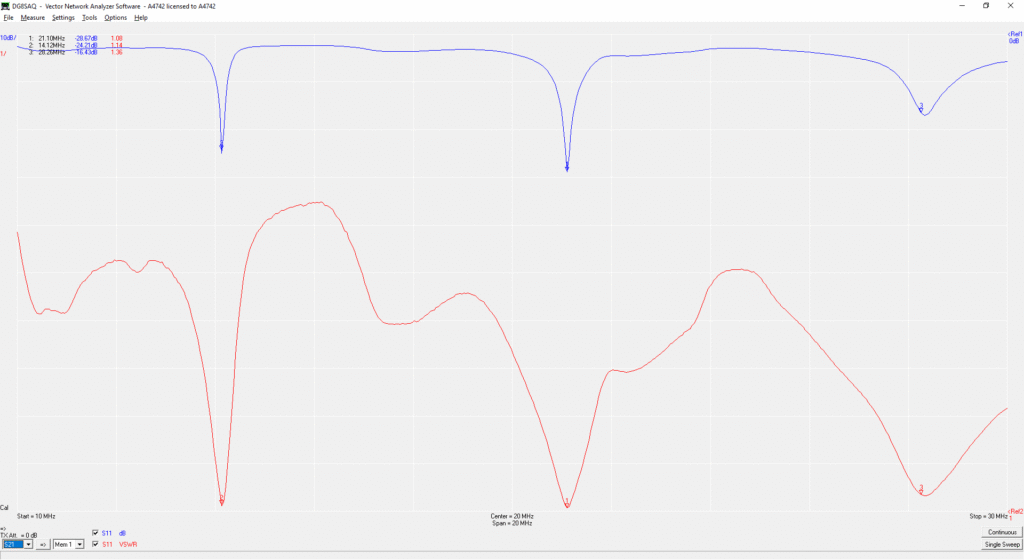
On our arrival, David from Gingerbread Hill kindly showed us where the beam (Mosley C-33-M) is kept in the store, provided tools to build it and also gave us a couple folding tables to use in the shack. We found the beam easy to assemble, although a dodgy bolt badly affected SWR at first. After replacing the bolt and liberally applying tape to the joint, the VNA plot looked like a great antenna:
VNA graph
VNA plot for the triband yagi

The beam is very easy to mount on the tower, because when down, the tower is at the height of the Heavenly Suite roof. It’s worth nothing that the beam is very much either on CW or SSB. With the beam tuned for the CW ends of the bands, SWR on 20m SSB was above 2:1, causing the KPA500 to complain. We therefore used a separate 20m vertical for 20m SSB, which also gave us the ability to be on 15m and 20m simultaneously. The tower itself has an electric motor, powered from outside the Two Bedroom Villa. We found it useful to use a couple UHF handhelds to talk from the rooftop to the person controlling the motor.
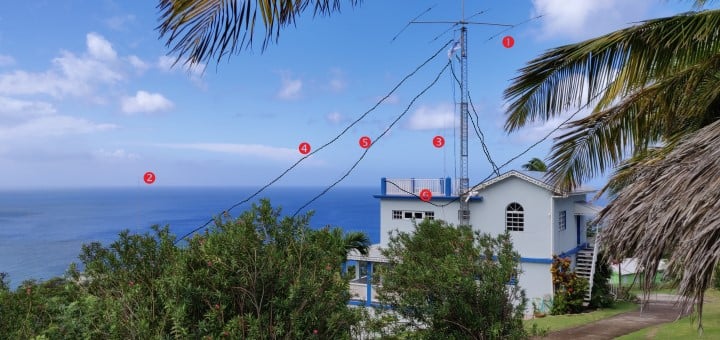
Annotated picture showing antenna locations
Antennas at Gingerbread Hill

1) Mosley C-33-M tribander; 2) 20m vertical; 3) 17m vertical; 4) 80m dipole; 5) 40m dipole; 6) 30m dipole

At this poor stage of the sunspot cycle, we made about 7500 contacts in the 5 days of operating between the 3 stations, mainly in CW with some SSB on 20m and 17m. We expected some backlash against publicising that we would not operate on FT8, but we actually only received positive comments about that decision.
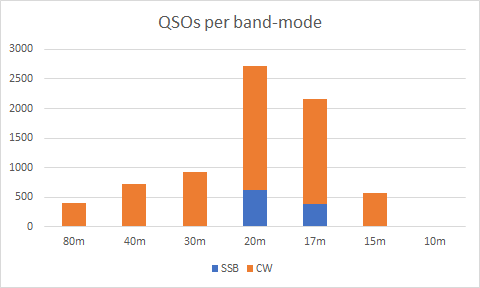
VP2MUW QSOs per band / mode

Despite the adverse conditions, we had several hours with over 150 contacts/hour, even reaching about 270 contacts/hour at the peak:
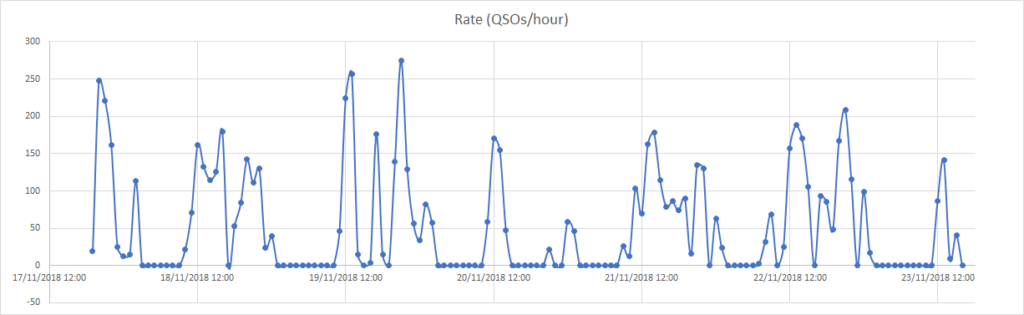
QSO rate at VP2MUW

With the three stations, we seemed to be able to make the most of the bands that were open at any given time we were active. In the graph below, a dot appears for the band if we made at least one QSO on the band in the hour:
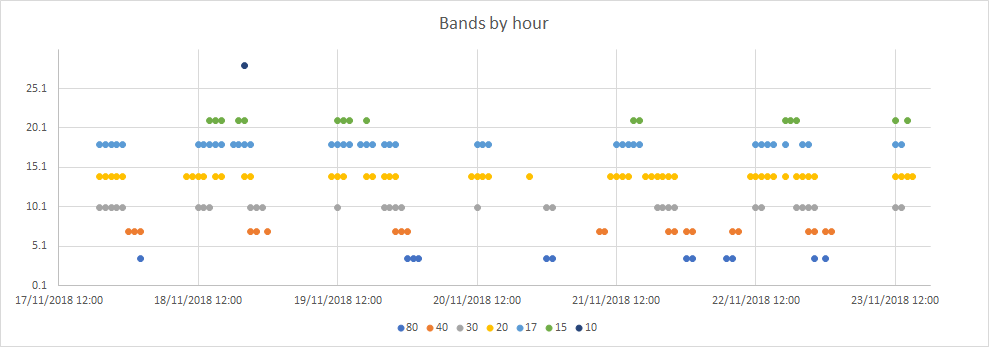
Bands we used over time

In terms of openings, we were very conscious of a good greyline path to Japan on 18MHz, 14MHz and 10MHz at our sunset, Japan’s sunrise. This was a great contributor to getting 223 JA stations in the log. We also ensured we were up at our sunrise to get the European opening on 40m in addition to the late-evening our time opening to EU on 80m. One morning, I also woke at 3:30am for the Europeans on 80m.

Into the Exclusion Zone

One of the things Clover arranged for our visit was a day-trip with Montserrat Island Tours around the island and into the Exclusion Zone. (Our tour guide was her son, Sunny.) This was well worth it. The morning tour included going to Jack Boy Hill to look out over the site of the former airport, now a flat plain of ash. We also visited a steam-powered sugar mill. (This is believed to have been an experimental feature, as most sugar mills operated fine with wind power.) After lunch at The Attic in Salem, we met with our police escort to enter the Exclusion Zone, the part of the island which is restricted due to continuing danger from the volcano. It should be noted that entry to the Exclusion Zone is not to be taken for granted. Just because you have arranged it doesn’t mean it will happen. It is only possible if the current Alert level is 0 or 1 (out of 5), and there have not been any heavy rains which could have flooded the roads in ‘mudslides’ of ash. The current Alert Level is posted on the Montserrat Volcano Observatory website.

The volcanic eruption which caused the evacuation and eventual abandonment of the capital, Plymouth, happened over 20 years ago in 1997, but the island is still far from recovering from it. Besides the lack of airport and insufficient electricity supply, hospitals and schools are also somewhat limited according to our guide. Heading into Zone ‘V’ (the most restricted area), the scale of the devastation was clear.
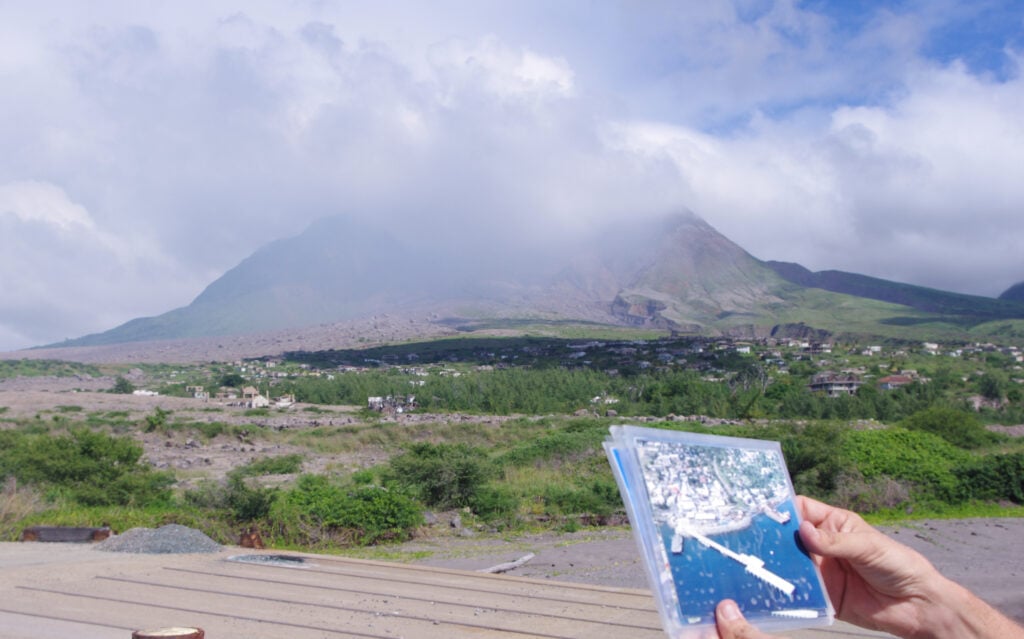
Plymouth: Before and After

Even with our police escort, continual radio contact with the Montserrat Volcano Observatory, and experienced local guide, we were still limited in where we could go within Plymouth. With so many buried buildings, many parts of the former town haven’t yet been mapped for any voids that might be under the ash, which you could fall into. Furthermore, there was a requirement to keep the car engine running while we were there and to not venture too far from the car, in case a speedy exit to the escape route were to be required.

It was amazing just how much deterioration has happened in the last 20 years. Compared to photos of Pripyat (the abandoned town near Chernobyl), which has been empty since 1986, the buildings in Plymouth have obviously been affected by the salt water and hurricanes in the much shorter timeframe. It’s especially heartbreaking to realise that when the volcano struck the town had only just finished rebuilding itself following the devastation of Hurricane Hugo in 1989.
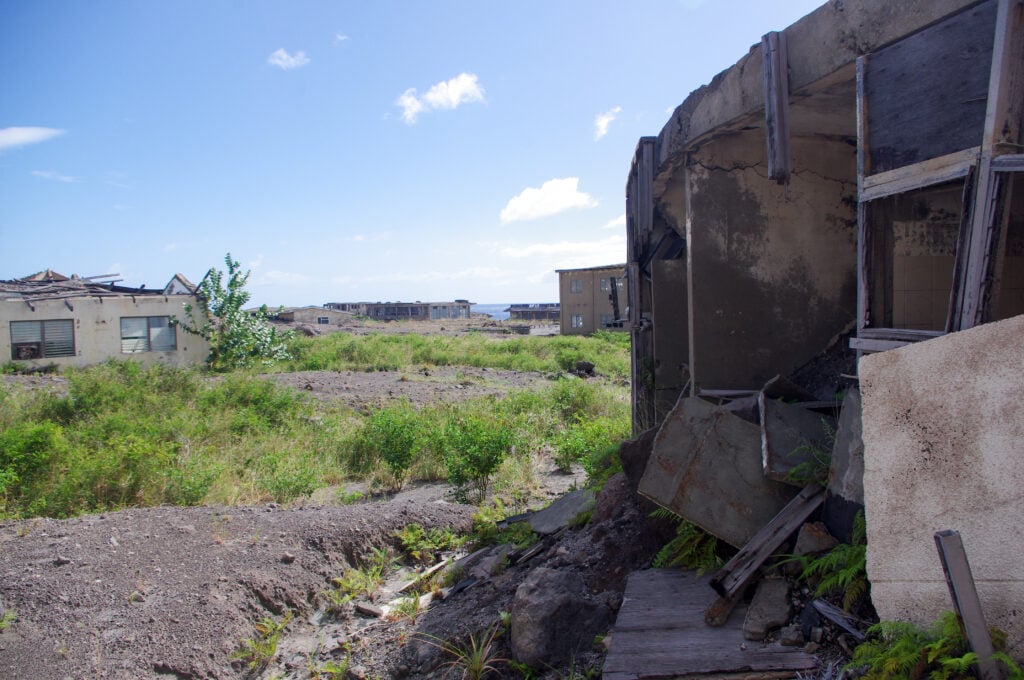
Abandoned buildings in Plymouth

While in Plymouth, our guide told us a couple anecdotal stories from the evacuation period. The first was the raid on the Barclays Bank vaults, with EC$1 million in brand new notes stolen from the branch. All that remains of the branch – and indeed the bank’s presence on the island today – is a light-blue painted fascia board rising above the ash and rubble. (Read an Associated Press report on the heist)

We were also told the story of one inhabitant of Plymouth with learning problems, who refused the order to evacuate and lived for several weeks with the whole town to himself before he was eventually caught up in a pyroclastic flow. It is believed that he was responsible for the pile of glass baby-food jars piled up in the corner of what was once the supermarket warehouse – he was eating his way through the stock while nobody was around.

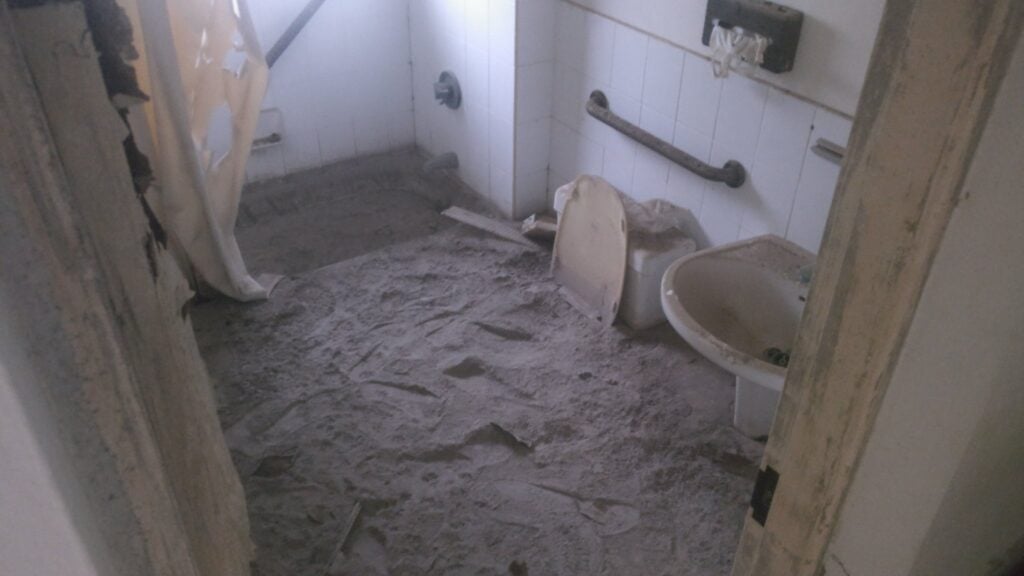
After an hour or so in Plymouth, we went to the nearby settlement of Richmond Hill, also abandoned, where the former four-star Montserrat Springs Hotel stands. We had more freedom to wander around the hotel and to see the volume of ash which has invaded the bedrooms, as well as the destruction to the exterior of the building,
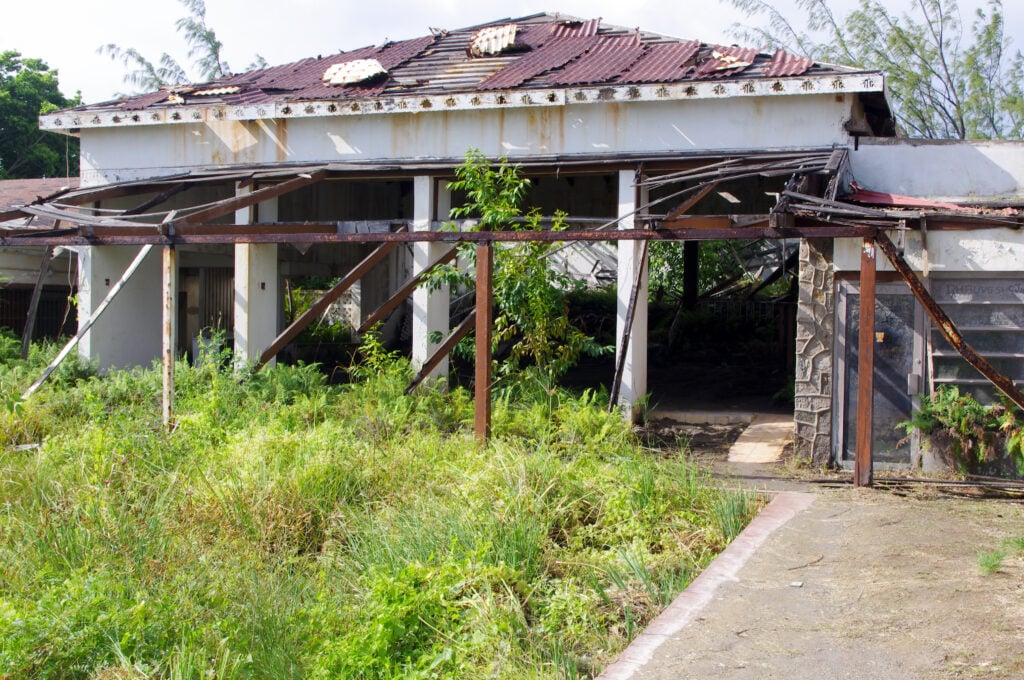
Outside bar and swimming pool at the abandoned Montserrat Springs Hotel
Volume of ash in the bedrooms at Montserrat Springs Hotel

Other tips for Montserrat

This is an assortment of other stuff I might have wanted to know before we went:

As you’ll have gathered, David and Clover, the owners of Gingerbread Hill, were excellent in recommending arrangements for our stay. One added bonus was that they arranged a hire car for us and, after we arrived on the boat, David took us to the police station in Brades to get our driving licences – and yes, the police station was open for business at 10pm! (There’s no automatic reciprocity for driving licences in Montserrat, but a trip to the police station, showing your home driving licence and paying EC$50 gets you a Montserrat driving licence.) This was absolutely invaluable. The shops in Brades are about 8 minutes’ drive from Gingerbread Hill down twisty, hill roads. As a result, everyone drives everywhere. The video below shows a sped-up version of this journey.

Similarly, the supermarket in Brades stays open late into the evening, and David also took us there to get immediate essentials once we had got off the boat on our arrival. It’s not fantastically well-stocked (by British standards it’s more like a corner shop than a supermarket) but it has enough to get by on. The owners also make their own curries, which are kept in the freezers in the shop in unlabelled containers. They are very nice indeed!

Water at Gingerbread Hill is potable, and very nice (it’s been filtered through volcanic rock, of course!). David provides water bottles in the fridge that you can keep cool.

David and Clover have recently completed building a small open-air swimming pool at Gingerbread Hill, which is a perfect way to cool off after lunch, when the bands have closed as they tend to do at midday near the equator. It has a lovely view out over the Caribbean.

The oven and hob in the accommodation are gas-powered (fed from gas bottles), meaning you can cook during powercuts. We didn’t use the microwave oven, but there is one in both kitchens. There’s also some emergency lighting (torches) in the Heavenly Suite but I found it useful to supplement this with the headtorch I had bought with me.

Gingerbread Hill has decent fast WiFi for internet access, however outside the villa you don’t want to even consider using data on a British mobile phone. Rates are in the region of £4-£6 per MB. Instead, Rob got a Transatel DataSIM for data in Antigua and Montserrat.

As well as Gingerbread Hill, David also helps run the Hilltop Café, a community café not far from Gingerbread Hill. Opening hours are limited but the Saturday morning Belgian Waffles with tropical fruit toppings are not to be missed. The Hilltop is also fascinating for containing many relics rescued from Plymouth during the evacuation period, including road signs from outside Government House, shop signs and even a TV camera from the local TV station, which closed down after the loss of their studios.

Montserrat is a windy place! Wind was a regular feature throughout our stay but it was unexpected. There were also some heavy rain showers at the start of the week, which kept the air quite humid, but they were short-lived and not too much of an inconvenience. You soon dried off in the heat naturally.

Costs

One of the most common questions on these trips is, how much did the trip cost?

The flight was, of course, the most expensive part of the trip but was paid for using Avios points and a British Airways 2-for-1 voucher. By way of a tip, if you are a UK-based DXpeditioner – or any other regular long-haul traveller – and you don’t currently hold a British Airways Premium Plus AmEx credit card, you’re missing out. (Standard disclaimer: I am not a financial adviser. These cards may not be suitable for everyone. They have a high annual fee, currently £195, and a representative APR of 76.0%. If you want to apply for one of these cards, I can provide a mutually-beneficial referral code.)

The rest of the trip came in at about £1000 each. This includes about £595 for Gingerbread Hill, £90 each for the return ferry, £80 for our rental car, £75 for the tour, £55 for groceries (we ate fairly frugally), £20 for the radio licences, £15 for parking at Gatwick, and £15 for eating out. We took £400 as East Caribbean Dollar cash between us, which was almost exactly what we needed after the villa, ferry, rental car, tour and radio licences had been paid by card.

We’ve had some generous donations with requests for QSL cards, which help offset the cost of printing the cards. Thank you to those donors.
SOTA trip to the West Pyrenees

In August 2017, I spent a few days doing some of the Summits on the Air summits in the Pyrenees.

Monday 31st July

Trône du Roi (F/PO-187): Attempt 1

After flying into Toulouse and getting a hire car (which took an unexpectedly long time), I drove to the Trône du Roi (King’s Throne) to operate, again this took a longer time than I expected. From what I’d read before leaving, Trône du Roi is a relatively easy two points, and wasn’t far from my hotel, making it an ideal option for a late afternoon activation before checking-in.

I made a basic error, however. In my haste to get through the airport and on the road as quickly as possible, I’d forgotten to pick up water. When I got to the hill, therefore, I not only found myself lacking hydration on a relatively warm afternoon, but I also realised it was rather later in the day than I had expected. I got to the 1000m elevation point (about a third of the way up) and then decided to head back down. I’d at least stretched my legs before tomorrow.

Tuesday 1st August

Pic d’Estremère (F/PO-129)

Today started with a reasonably early start, as I wanted to do two big (8 point) mountains on the Spanish border, and my hotel was already 1.5 hours away from where I’d need to park at the Col du Portalet.

Getting there was no problem and I was soon on my way up the Pic d’Estremère. On the face of it, this is another fairly easy option. It’s right next to the car park at the former customs post and – on the map at least – there are some obvious paths to the top. The reality was that it was rather steeper in places than I had expected, and certainly one that needs hiking poles. The bigger problem was that the paths were less easy to find than I had expected, other than the big GR10 cross-Pyrenees route, which doesn’t actually go to the summit. On my ascent, I made the mistake of not staying on GR10 for quite long enough and ending up on a particularly steep face instead, from which I had to make a quick retreat. Nevertheless, I eventually picked my way to the top and, once there it’s a lovely operating site. There’s lots of space within the activation zone and there was nobody else on the mountain at all. I was quickly into a decent pileup and, despite the odd problem with the antenna falling over, it was a very pleasant activation. As with all my contacts during this trip, I was exclusively on 30m CW.

Loading map…
Distance
—
Elevation gain
—
Elevation loss
—
Max elevation
—
Waypoints
—
Elevation profile

Soum de Grum (F/PO-149)

After returning to my car for lunch, my plan had been to tackle the Pic d’Anéou, just on the other side of the road from the Portalet, another 8 point mountain. By now, it was getting quite warm, however, and I had also read that there’s a tricky section requiring poles near the summit… and one of my poles had broken on my way up Estremère! As a result, I decided to switch to my Plan B: the Soum de Grum. This is about a one hour drive from the Portalet, enough time to crank up the air conditioning and cool down before starting another ascent.

The main website I used to research routes, Topopyrenees.com, describes (in French) the Soum de Grum as being a nice easy walk, suitable for children, up decent paths from the car park at the Col d’Aubisque. If that name sounds familiar, the car park has been the site of many iconic Tour de France mountain-top stage finishes.

The website wasn’t wrong at all. However, as I’d been driving, clouds had started to form and, by the time I was on the Aubisque, visibility was almost nothing. Despite this, I had no problem at all with following the path and finding my way to the summit of the Soum de Grum very quickly. The path isn’t particularly steep at any points, and you don’t need to use hands. It is also perfectly possible to do without poles.

Once there, there was relatively little space on a bit of a ledge, although this may have partially been by sensation as I couldn’t see where the sides of the mountain were in the fog, and so I was playing it a bit safe. Consequently, I found myself operating with the dipole almost lying along the ground, but it still wasn’t a problem to get the required four QSOs and make my way down. In fact the most challenging part of the activation was still to come: driving down hairpin bends with steep drops if you misjudge them, in an unfamiliar car in limited visibility is rather more difficult than walking along a clear path!

(Note: I got the summit reference incorrect in this tweet: F/PO-149 is correct)

Wednesday 2nd August

My original plan for the day had been to climb Pic Lasnères (F/PO-138) and Mardas (F/PO-126) in a loop, following a combination of the routes described at Pic Lasnères and Randonée Lac du Montagnon. Mardas would have been a first activation and looks pretty do-able (although note what the description says about needing poles on the way down).

These mountains are reached from the village of Adyius and following a path over 6.5km to the parking place. When I got to Adyius, however, the road was blocked both by preparations for a local fête taking place that day and a more permanent sign indicating no entry except to residents. In my hire car, I wasn’t prepared to take the risk of going down a track I wasn’t supposed to be on.

Luckily, the Trône du Roi, which I’d failed to activate on Monday, wasn’t too far away, so I turned around and went there instead.

Trône du Roi (F/PO-187): Attempt 2

The Trône du Roi is reached along about 3km of slightly rutted, gravel (not tarmac) track. It’s not bad, however, and I didn’t feel concerned about doing in the car.

This time I had plenty of water and, at this point in the morning, plenty of time. As I climbed, the temperature became steadily hotter and by the time i reached the summit it was in the high 20s Celcius. I was actually rather glad that I hadn’t been able to get to Lasnères and Mardas, as in such heat I think the loop might have been a bit difficult.

The path up the Trône du Roi was initially under trees and some of the stones were a little slippery in the morning dew. Once out of the trees (and under the heat of the sun), the path climbs steeply and fairly unrelentingly for its whole length. I never felt in danger but there are places where it’s fairly close to the edge of the mountain, so you definitely need to watch where you are going, both on the ascent and descent.

The summit itself was much more uncomfortable. This is another fairly narrow summit with steep drops off the side, it was fairly busy with people, covered in sheep droppings and with swarms of flies everywhere. You can even see some of the flies in the tweet below.

In addition to the lack of space, I felt an inexplicable amount of vertigo up here (probably brought on by the heat and disorientation caused by the flies, which were crawling all over my face, in my mouth and even getting stuck in the CW paddle!). Trying to guy my SOTA pole would probably have resulted in it falling off the mountain even if I could keep it away from other people, so I literally lied the dipole legs along the grass and hoped the elevation would do the rest. It did, and as soon as I had four QSOs, I was off the summit as quickly as possible.

Loading map…
Distance
—
Elevation gain
—
Elevation loss
—
Max elevation
—
Waypoints
—
Elevation profile

Issarbe (F/PO-171)

By now, I was feeling pretty tired in the heat of the day, so I opted to drive a bit further to bask in the air conditioning(!), heading to Issarbe. Before coming to France I’d not only come up with my Plan A list of targets, but also a list of other options. From that research, I knew that Issarbe should be potentially one of the easiest 4-point options in the Pyrenees chain. Issarbe is a ski resort, and so has a decent road leading nearly to the summit. In summer, reaching the summit is just a matter of a short walk up the ski runs and then a couple of decent paths to get you into the activation zone. That’s exactly what this mountain proved to be like, and I had a wonderful short activation making a lot of contacts. There’s plenty of space for putting a dipole out here.

Over the course of the 20 minutes or so that I was operating, I gradually became aware of a cool wind starting to blow up and shadows becoming weaker. Looking up at one point, I realised that a repeat of yesterday was underway – cloud was forming in the valleys and starting to convect up the side of the mountains. There was a risk that we could plunge into near-zero visibility once again and, although I was happy enough at my ability to follow a ski run back to the car, I didn’t really want to do another drive down a mountain in such conditions. As a result, I had to stop while people were still calling (something I try not to do) and quickly pack up.

A few minutes after the photo below was taken, you couldn’t see the ski station buildings from the summit.

Loading map…
Distance
—
Elevation gain
—
Elevation loss
—
Max elevation
—
Waypoints
—
Elevation profile

Friday 4th August

Miramont (F/PO-238)

After a rest day on the beach, my original plan had been to return to Toulouse via Pic de Cau (F/PO-260), a nice-looking 2-point hill just off the motorway. Unfortunately, I’d been unable to to find any details as to how long the walk was likely to take, where best to park, etc. After the issues I’d had at the airport on my way into France, and with some stories in the press about extra time being needed for passport controls in France, I didn’t want to take the risk of being late, so instead I decided to go to another of my Plan B options: Miramont.

Although only one-point for SOTA, it’s a nice easy one. Just off the main road from Tarbes to the pilgrimage site at Lourdes, drive into the village of Julos and walk up a track to a mobile phone base-station site. That’s really all there is to it. I set up the station just outside the transmitter compound (still easily within the Activation Zone) and within just a few minutes had a nice small pile-up.

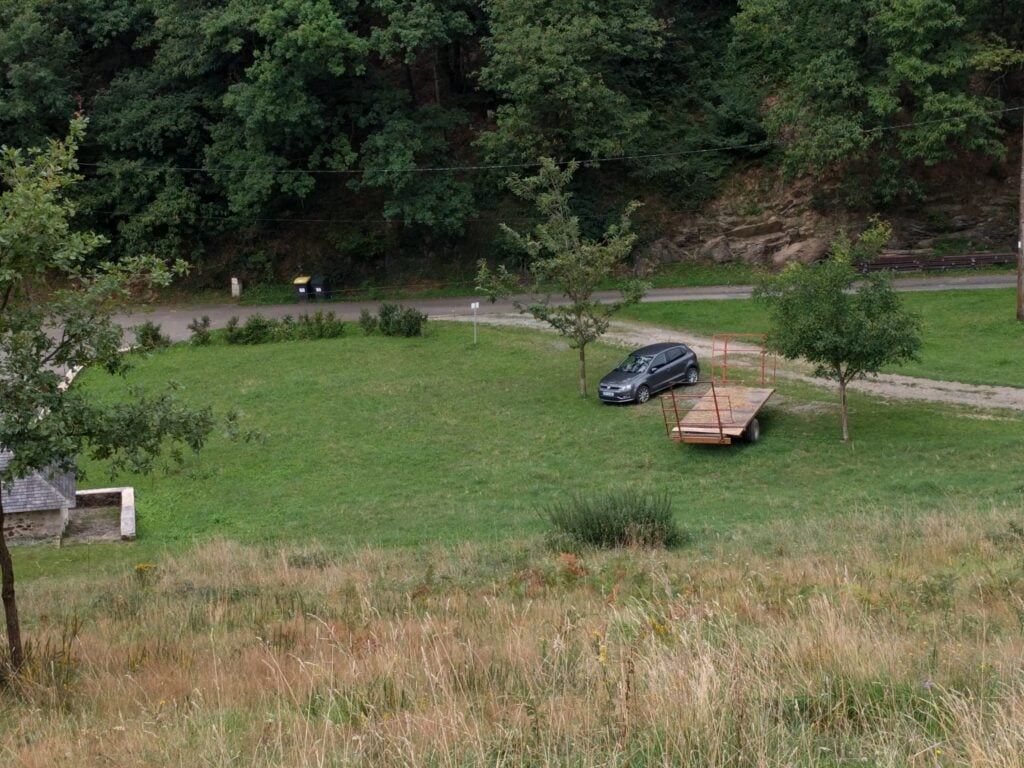
Just for reference, speaking to a local tractor-driver, the ‘approved’ parking place in Julos is on the gravel area between the two trees in the photo below (where my hire car is), right at the start of the track up Miramont.

Overall, this was a wonderful trip. Although I didn’t get to everywhere I’d originally planned, I had a very pleasant time in the mountains and bagged 35 SOTA points in three days.


Radio activity from Chile

As some of you might be aware, I’m going travelling in Chile for most of November and December. This isn’t a radio DXpedition as I can only take one 23kg suitcase to last 6 weeks and clothes and camping stuff have to take priority!

That said, I do have a Chilean licence, and I am taking some equipment, so this is the plan at time of writing:

Callsign

As I am travelling and don’t have a particular base in the country, the Radio Club de Chile have kindly suggested I use their HQ address in Santiago (CE3) as my licence address. This means that my Chilean licence has been issued as CE3/M0BLF

As I understand the Chilean rules, when I am operating from other parts of Chile, I have to use the local area number as a suffix to the Santiago callsign, eg. CE3/M0BLF/6

HF

I’m taking my IC-706 and a 15m dipole. There won’t be any linear and power will be from a Gel Cell (Sealed Lead Acid battery), which I’ll buy out there to carry on the part of my journey through Patagonia from Temuco – Tierra del Fuego (19th November – 11th December, if all goes to plan). Due to the fact that I can’t take such batteries on planes, I won’t be using the HF gear from other places in the country.

I expect most activity to be CW / PSK31 to reduce power demands. I may also send back a couple photos via SSTV, just because I can. When I’m further south, away from where most people are beaming, I’ll aim to appear on WSPR for a little while before I switch to CW. WSPR allows me to announce I’m there without requiring a full-power CQ call that would be needed to reach the RBN.

Activity will only be occasional, from campsites, and I may not be able to get the antenna up high as I don’t have luggage space for poles, etc.

CQ WW CW

The biggest CW contest of the year takes place while I’m in Chile. I plan to operate as much as the batteries will permit as CE3/M0BLF/6 from the Puyehue region in central Chile. This will be Single Band on 15m. I’ll decide out there whether to enter Low Power or QRP.

IOTA Activations

Assuming I stick to my itinerary, I should also be active from:

  • Chiloe (SA-018) on 30th November and 1st December as CE3/M0BLF/7
  • Tierra del Fuego (SA-008) on 10th December as CE3/M0BLF/8

Again, this will be low-power, battery-operated, single-band, so please don’t expect too much! For the same reason, I will not arrange skeds.

Yes, I will be passing lots of rare island groups as I sail down through Patagonia between Puerto Montt and Puerto Natales, but I’ll be on a ferry and I won’t be able to disembark. Another time, perhaps.

APRS/Echolink

  • I’ll be active on APRS as M0BLF-7 in areas with APRS coverage, but be aware that coverage in the country isn’t very great
  • I’ll be taking an Iridium tracker (thanks M0VFC) which cross-posts positions to APRS as M0BLF-12
  • I hope to use some of the local 2m Echolink nodes to contact people at home

Updated 5-Nov-15: Switched band to 15m in the light of the latest propagation predictions; mentioned the WSPR beacon.

That’s all folks…

That’s it. At 01:30 UTC on 17th July, we finished our DXpedition to Svalbard. So, how did we do?

The raw numbers

On the face of it, this wasn’t our most successful DXpedition in terms of QSO count. During the six full days we were QRV, we only made 6305 contacts between the six of us.

That hides a significant fact, however: this far north we never really expected to make a huge number of contacts. I’ve written more about propagation below, but to summarise only 30m, 20m and 17m were really open.

We had decided before we came to split into two groups, therefore: On Sunday, M0VFC, M1ACB and myself went on an excursion to Barentsberg allowing G3ZAY, M0HSW and M0TJH to stay in the shack. We did the opposite on Monday. Then, on Tuesday and Wednesday, we adopted the same pattern for our excursion to Pyramiden. This means that for most of the time, there were only three people in the shack.

Perhaps more surprising for us was the 44:56% SSB:CW (2858:3447) split. As it happened G3ZAY, M0VFC and I made almost exclusively CW QSOs, leaving M1ACB, M0HSW and M0TJH to do almost all the voice operation. That wasn’t planned as such, but worked well from our point-of-view.

Propagation

Propagation in Svalbard in the summer is weird. First of all, there is no nighttime during the months of Midnight Sun, so nothing below 30m ever really works. We made just 29 QSOs on 40m, and none on anything lower.

30m had some good openings during morning and evening but was pretty dead during the main part of the day. Throughout what would be the ‘night’, there was often good propagation to the US, which we could see from the 30m APRS beacon we operated.   965 (15%) contacts were on 30m.

20m was the most reliable band and was often open to JA, EU and NA at the same time. Even it went through a quiet period from mid-morning until mid-afternoon however. 3534 (56%) contacts were on 20m.

17m was often open during the afternoon to JA and NA, and then EU in the early evening. There was almost nothing here during the mornings. 1772 (28%) contacts were on 17m.

15m and higher were pretty much constantly dead. We made just 5 CW QSOs on 15m.

Overall, however, the main thing we noticed was that propagation was hugely susceptible to the K-Index. At a K of 5, most bands were pretty unusable. On days when K went down to 2, we made many more contacts, except for our final day which seemed to buck that trend. It might be that flux collapsing to 100 was responsible for that.

Logging

We were logging with Win-Test. With six operators using their own callsigns, you might have assumed we had six laptops but with only three stations we didn’t do that. We instead adopted the approach we’d used successfully in VP9: all copies of Win-Test were networked together and we all logged into a single log. We ‘logged in’ to Win-Test for each of our shifts, however, so we could then separate the logs based on the operator callsign.

During the latter part of the trip, we were uploading logs automatically every 30 minutes to Clublog and LotW. We’ll blog more about how this was done later (and I think a presentation for the RSGB Convention is planned), but basically we had a program listening to Win-Test’s network, capturing the QSOs, compressing them, and then batching them up.

APRS

We always like to innovate in some way on our DXpeditions, and this year (in addition to the live uploads), we also experimented with running an APRS beacon using MFSK16 on 30m. This was less successful than we had hoped given propagation on that band, but it was useful in that I could check how open 30m was to the States when I woke up. I could have used WSPR for the same result, though, assuming internet connection.

That’s kind of the point, though: had we not had internet access (which we weren’t expecting to have), APRS could have given us a route to do basic messaging if required. I think it’s something we will continue playing with to see whether the technology can bring anything extra to DXpeditions.

Thanks to members of the Cross Country Wireless email reflector for running IGates for our packets, and especially to Chris G4HYG for writing APRS Messenger, which we used for the beacon.

And finally…

Photos

My photos from the trip are in a set on Flickr.

Aerial photography

Hugo, M0HSW, brought a drone with him as his hand-luggage. We might have ridiculed him at the airport a little bit, but the film of aerial shots of Svalbard (Longyearbyen and Pyramiden) that he has produced is spectacular. Viewing it is highly recommended:


Staying at JW5E

While we’re in Svalbard, we’re operating from the JW5E shack, the local radio club cabin. I’m also sleeping here, so I thought I’d give a quick introduction to what’ it’s like to stay at the station, which can be rented by other radio amateurs. For official information on the station, see jw5e.com

Before going any further, I should stress that this post is intended only as a factual description of the shack at time of writing, in an attempt to help future visitors with some of the stuff we hadn’t known. This isn’t to criticise – the local amateurs have been wonderfully welcoming, and their willingness to open the station to others is very much appreciated.

Location

The shack is located on the shore of the fjord, just east of the main centre of Longyearbyen, but within easy walking distance of the main shopping street and the hotels in town.

Polar bears have been known to come up the fjord, so there is a slight risk, but the shack is within the ‘no polar bear protection needed’ area of town. There’s a can of CS gas by the door in case of an unexpected visitor, but we’re told it would be technically illegal to use this (on the safety grounds that you’d be likely to spray yourself while panicking!).

There’s good mobile phone coverage in Longyearbyen from both Telenor and NetCom. Although our mobile operators in the UK claimed they didn’t have roaming agreements with Svalbard, in practice it seems that if your operator has an agreement with the Norwegian operators listed above, roaming works. For Three UK customers, it looks as though this means Svalbard comes under the Feel At Home deal for Norway; I’ll update this information if we get an unexpectedly large phone bill on our return!

Credit cards are widely accepted. I’d always carry some cash but we haven’t needed very much. On the whole, goods are quite expensive because of the cost of importing them to such a remote location.

JW5E

Facilities

Living space

The cabin has kitchen with fridge, kettle, coffee machine and microwave, 2 bunk beds, sofas and a toilet. There’s heating (and in fact the shack has been at times too warm at night, at about 20c) but there’s no running water here. You can buy bottles of water in the amply-stocked supermarket, and we’ve also been filling bottles at the hotel where some of the other operators are staying.

The toilet is a combustion toilet ‘for solid matter only’ (liquid deposits are left on the beach outside), which is easy to operate. It seems you have to guess whether you need a 40 minute or 70 minute burn for the size of the job, however! I’d recommend bringing some alcohol hand gel as there’s no water to wash your hands.

The beds are comfortable, although right now someone using the upper bunk would have to share it with a Butternut vertical! Just bring a sleeping bag and you’re good to go.

Shack

The shack currently comes equipped with a FT-1000MP Mark V and TS-870, with an interlocked six-pack antenna switch at each of the two operating positions. We’ve actually crammed four operating positions into the space and put the TS-870 to one side so we can fit the two K3s and IC-706Mk2G we brought with us. The FT-1000MP Mark V station has a MicroHam unit and computer. Each operating position has a 20A power supply.

The shack used to have an amplifer but this has now been removed due to repeated damage by visiting groups, which is a pity but understandable. We’ve got a KPA500 with us. On the other hand, the shack now has Wifi, which was a nice surprise. This is supplied from Martin JW5ZLA’s home connection, via a Ubiquiti link on the tower.

The shack also has a range of useful accessories, patch cables, etc neatly arranged on shelves. There’s also a limited supply of tools but as always, it’s probably safest to bring your own accessories! Power, by the way, is 220V 50Hz with European plugs.

If you’ve seen W2NAF’s video of the shack, there has been some renovation work since it was filmed, so the orientation is now the other way around:

JW5E shack

Antennas

The state of antennas at the shack is a bit ropey, so you may want to bring plenty of wire and fibreglass poles. A climbing harness for the tower may also come in useful. We’ve installed a vertical dipole for 20m on the beach outside the shack for our operation.

As of today, JW5E has:

  • 10m / 12m beam
    We haven’t used this as the bands haven’t been open. It’s very close vertically to the 15/17/20 Optibeam, however, so it may not be in tune.
  • 15 / 17 / 20m Optibeam
    This is missing a director and is rather close to the 10/12m beam. SWR is OK on 17m but it is high on 15m (about 2:1) and very high on 20m (about 3:1 at the CW end and 2:1 at the SSB end). We’re using it as a 17m single band beam.
  • 30m dipole
    This is working OK.
  • 40m sloper
    Needs an ATU on 40m but works fine with a good SWR on 15m.
  • 80m dipole
    We haven’t used this as the band isn’t open during the 24h sunlight in the summer.
  • 6m beam (fixed pointing South)
    The reflector is badly bent and the coax doesn’t enter the shack.
    We’ve now bent the reflector back since the photo below.
  • 6 – 40m vertical
    We’ve used this a bit on 40m but generally the sloper seems better. We haven’t used it on other bands as we noticed that RF gets into the shack (it’s literally just outside the window).
  • 2m and 70cms verticals
    We haven’t tested these.

The HF beams are on a ProSisTel rotator in the shack.

JW5E antennas

Amateur radio on Spitsbergen

There is a 2m repeater, JW9SRR, on a mountain out of town, which can be reached from a handheld outside in Longyearbyen. We’re told it’s not completely reliable at the moment but it seemed to open when we tested it. It’s on 145.600 with a -600Hz shift, 91.5Hz CTCSS.

There’s also an APRS node on the European APRS frequency (144.8MHz) and there are simplex frequencies on the VHF bands used by the locals, which are listed in the shack.

An excursion to Pyramiden

After our trip to Barentsberg a couple days previously, yesterday we went to Pyramiden, named after the Pyramid-shaped mountain above the town. Like Barentsberg, this is a Russian coal-mining settlement. Unlike Barentsberg, however, Pyramiden is a ghost town.

Or almost a ghost town. The mine closed in 1997. Under the Svalbard Treaty, if a settlement is abandoned for 10 years, the country responsible has to remove all trace of the town and return the area to its natural state. In early 2007 – 9 years and 10 months after the town had been abandoned – the Russian government decided it was cheaper to pay for 2 people to stay there, repairing buildings, than removing all trace of a town for over 1000 people and the associated mine. Today, the population has increased to 8. They get all their supplies from Barentsberg and, apart from one square metre on the harbour where there’s mobile telephone coverage from Longyearbyen, the only communication is by letter twice a month or satellite phone for emergencies.

Nevertheless, to all intents and purposes, this is a ghost town, and a fascinating relic of a remote outpost of the Soviet Union. Recent polar bear visits to the town meant that we weren’t free to explore; we had to travel as a group with our guide, rifle in hand, just in case.

Even the 'r' of the town's name 'Pyramiden' is missing on this sign.
Even the ‘r’ of the town’s name ‘Pyramiden’ is missing on this sign.

Pyramiden town

A child's painting in Pyramiden cultural centre
A child’s painting in Pyramiden cultural centre

Film abandoned on the floor in the Cultural Centre, which was also the town's cinema.
Film abandoned on the floor in the Cultural Centre, which was also the town’s cinema.

The main street on Pyramiden, called '60th Anniversary of the October Revolution Street', looking towards the Cultural Centre and statue of Lenin.
The main street in Pyramiden, called ’60th Anniversary of the October Revolution Street’, looking towards the Cultural Centre and statue of Lenin.

Our boat's route to Pyramiden. Again, the track that appears to be on land is because the glacier has receded, so the map is out-of-date.
Our boat’s route to Pyramiden. Again, the track that appears to be on land is because the glacier has receded, so the map is out-of-date.

For anyone wishing to do this trip themselves, this excursion was organised by Spitsbergen Travel and comes highly recommended. The guides are excellent. If you’re wondering whether to do both Barentsberg and Pyramiden, I’d say emphatically, yes. The towns might both be Russian, but that’s where the similarities end. I found Pyramiden felt more comfortable as its ghost town nature is explicable with the collapse of mining after the fall of the USSR, unlike Barentsberg which just feels out of place.

An excursion to Barentsberg

Yesterday, Rob M0VFC, Steve M1ACB and I left the rest of the group in the shack while we took a trip to the Russian settlement of Barentsberg here on Svalbard.

The excursion was organised by Svalbard Travel and is moderately expensive, but well worth the cost for a long day on a boat with an excellent guide. The only disappointment was the fog that plagued us most of the way to Barentsberg.

The trip starts with a detour to the Esmark glacier, where we were given barbecued whale on the deck for lunch. I’m not insensitive to the controversy surrounding eating whale but when in Rome… I’d never had it before, and it’s unlikely I will have it again as the meat was rather tasteless other than the chilli marinade it had been kept in.

Esmark GlacierAfter this spectacular detour (where we even got to see some of the ice breaking off), the ship turned South across the fjord to Barentsberg, where — after a minor issue in which our boat got entangled in another boat’s mooring lines — our guide handed over to a Russian guide for the tour of the town.

Like most places on Svalbard, Barentsberg was established as a coal mining town and was Russian-controlled for almost all of the 20th century (and it still is). There’s something distinctly not quite right about the place, however. Most of the town has seen better days. The buildings are rotting and collapsing and little effort is being made to preserve them as nature takes over. A broken child’s swing gave me echoes of the photos you see of Pripyat near Chernobyl.

Barentsberg

In the main square, the guide was keen to point out the statue of Lenin and the sign proclaiming ‘Our goal: Communism’, saying that of course their goal no longer is Communism and that the banner today only reflects an important part in Russia’s recent history. She then went on to explain how the workers are provided housing in large accommodation blocks, there’s a subsidized canteen, and only two shops in the town – one for food and the other for everything else. They operate a cashless society, with credit being stored on cards with which everyone is issued. Contracts for the mining workers are for a fixed 2 years, after which they are allowed to go home for 2 months. I’ll leave the reader to consider the implications of the preceding sentences, but suffice it to say, the place felt like a timewarp. We were also told about the Russian consulate in Barentsberg being the most northerly in the world, with the great acclaim from our guide ‘It’s Russian, and it’s here’.

Lenin outside the worker's accommodation
Statue of Lenin outside the worker’s accommodation. The banner reads ‘Our goal: Communism’

Perhaps the strangest thing about the town, however, is the size of some of the facilities. The current population is just 400 and yet the school (for 40 pupils) and newly-built hospital are clearly designed for many, many more than just the current number of miners and their families.

The school for 40 pupils. The artwork was done a few years ago by students at the St Petersberg School of Arts.

Our tour's route from Longyearbyen to Esford to Barentsberg and back to Longyearbyen. The position that suggests we were on land near Grumant is incorrect - it's the map that's wrong not the position!
Our tour’s route from Longyearbyen to Esford to Barentsberg and back to Longyearbyen. The position that suggests we were on land near Grumant is incorrect – it’s the map that’s wrong not the position!


Hello from Svalbard

After two flights (London – Oslo, then Oslo – Longyearbyen), we’ve arrived in Svalbard. This is the view from the shack, taken just after we arrived (about 00:30 local time). The midnight sun is very real!

View from the shack on Svalbard

The first surprise, we have mobile phone signals and the shack has internet. So, our fears about lack of connectivity were slightly misplaced. Nevertheless, we’re still going to be uploading logs via the Iridium satellite link, and we’ll be doing APRS over HF, because we can.

The JW5E shack has been slightly reconfigured since the video W2NAF took last year but some of the antennas no longer work efficiently. As I type, this is the current situation (which may change over the week):

  • We’ve installed a new 30m dipole. Rob M0VFC is on 30m CW with the shack’s FT-1000MP Mark 5.
  • Steve M1ACB is using the 40-6m vertical to operate 17m SSB with his Elecraft K3.
  • Hugo M0HSW is on 20m using the 15/17/20m beam using Rob’s K3 and a KPA500.
  • My IC-706 is set up as the data station for later on. It will use any antennas that are free.

We’ll be on during the IARU contest – we’ll be giving reports but we aren’t entering: with so few bands open this far North and multiple callsigns between us, we wouldn’t be able to be competitive.

M0HSW, M1ACB and M0VFC operating in Svalbard

DXpedition Announcement: Svalbard, July 2015

From 10th-17th July 2015, I will be one of six operators activating the JW5E shack on Svalbard.

We’ll be operating on 40m-10m (and maybe some 6m if conditions allow), mainly on SSB and CW, using JW/{homecall}.

We won’t arrive in Longyearbyen until late in the evening of Friday 10th, and we depart very early in the morning on Friday 17th, so in practice we’ll be QRV for about six days.

Please remember that Svalbard has midnight sun for about four months, so it won’t get dark while we’re there. That means that we’re expecting 40m and 15m+ to be very difficult.

QSL will be via Clublog OQRS (please don’t send paper cards). We will be swapping operator at times, so please ensure you log the correct home call – don’t rely on an old spot from the cluster.

For more information, see my main DXpedition page at http://www.domsmith.co.uk/amateur-radio/dxpeditions/2015/jw

The full operator list is:

  • Myself
  • Martin G3ZAY
  • Hugo M0HSW
  • Tom M0TJH
  • Rob M0VFC
  • Gavin M1BXF

VP9/M0BLF: Log analysis

LogAnalysisOne of the things I like to do shortly after a DXpedition is to do some fairly detailed statistical analysis on my log. This helps highlight openings or areas of the world I might have missed, and helps me consider improvements for the next trip. It can also help identify where propagation predictions did, and didn’t, match reality.

This time, I’ve decided to share my analysis here.

Over the week, between four of us operating fairly leisurely, we made just under 16,000 QSOs, of which I made 3320.

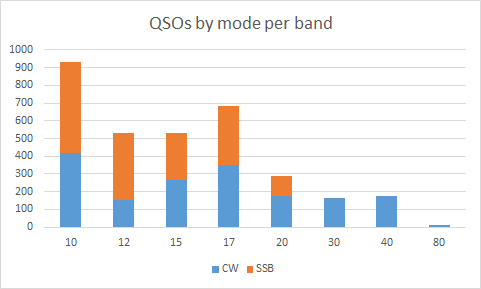
Mode and band choice

As a team, we’d decided before the DXpedition to focus on the WARC bands, because VP9 is often activated in contests. Due to the 150W limit in VP9, most of the others had also decided to concentrate on CW, but I wanted to maintain about a 50:50 balance of CW and SSB.

As indicated in the graph below, I broadly achieved that balance on the higher bands, but conditions just didn’t permit CW on 40m and 80m. Moreover, with the higher bands performing so well, I was able to take advantage of the conditions on 10m and 15m, even though that meant slightly less WARC activity than I had planned.

image

Rates

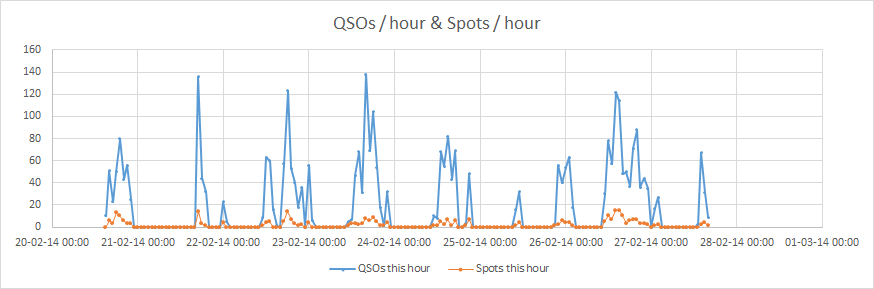
VP9 is also not a rare DXCC, so we weren’t aiming for particularly high rates on this trip. We’d wanted to have the opportunity to do plenty of tourism while we were there, too, so we were expecting to have some days with less activity than others. Luckily, we also knew that propagation around midday could be difficult on several bands, so this would give us the opportunity to go out and see more of the island.

The graph of QSOs / hour reflects this, but I still managed to approach 140 contacts per hour a couple of times, despite this relaxed operation.

It is also interesting that the number of spots per hour roughly tracks the number of QSOs I was making (I‘m not sure whether this is cause or effect; I suspect a bit of both)

image

Perhaps more notable is the rate that was achievable on each band. 12m was far the most open band in these terms, which is rather a surprise, particularly when compared to 10m. Obviously the idea of concentrating on WARC bands wasn’t a bad idea. (This graph is slightly misleading in that it doesn’t take into account when I was operating and on several occasions my role was to make the last few QSOs as the band closed, while the others operated on more productive wavelengths.)

image

Geographic spread

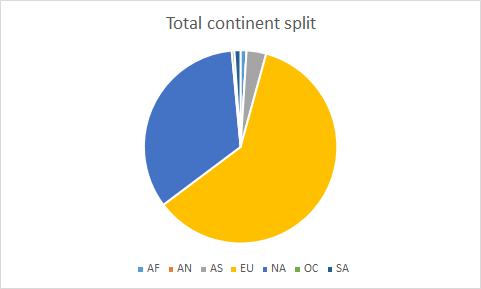
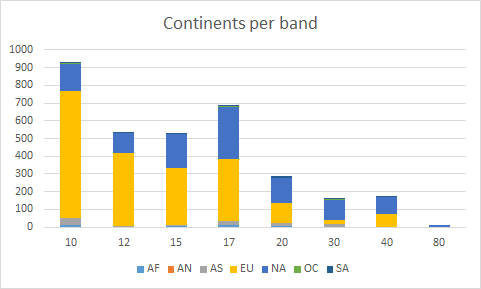
I’m rather surprised to see how skewed towards Europe my log is; it certainly felt as though I was making many more contacts to North America. It’s pleasing that there is a small number of Asian stations in there too, however. This was mainly contributed by some reasonable runs into Japan on a slightly difficult auroral greyline path over the Arctic.

image

This data becomes more interesting when analysed per band, however. Whilst Europe dominated on 10m and 12m, the Europe : North America balance was more even from 17m downwards (and, indeed, North America was the source of a majority of my QSOs in 30m).

The lack of Asian stations on 12m is mainly because Martin G3ZAY operated on that band during the greyline openings.

image

I’m slightly surprised there aren’t more African stations in the log. It should have been an easy path but we just didn’t have many callers from there.

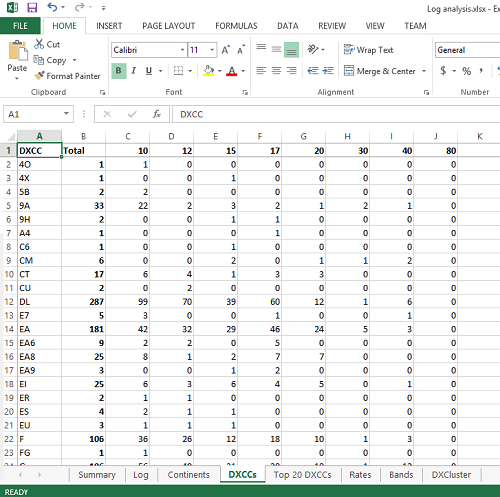
The top 20 DXCCs to call me were more-or-less as expected but, being patriotic, it’s great to see so G (England) so high in the list:

DXCC

Total QSOs

% QSOs

K 987 30%
DL 287 9%
I 284 9%
G 196 6%
EA 181 5%
SP 136 4%
F 106 3%
UA 101 3%
VE 101 3%
JA 88 3%
UR 73 2%
PA 66 2%
ON 61 2%
OK 60 2%
SM 41 1%
S5 36 1%
9A 33 1%
OM 33 1%
OE 26 1%
OH 26 1%

Anything else?

Is there anything else you’d like to learn from my log? If so, feel free to add a comment. For those who are interested, this is simply a CSV export from Win-Test into Excel, so I can easily analyse any other factors Win-Test can export.